


Why Teak Turns Gray and When to Intervene

Teak outdoor furniture adds timeless elegance and lasting beauty to any outdoor space. Its exceptional durability and natural resistance to weather make it a favorite choice. However, if you own teak, you’ve likely noticed its rich, golden-brown color gradually transforming into a distinguished silvery-gray patina. This is a natural process when exposed to the elements. But what if you prefer to keep its warm, honey tone, or even bring back the original glow to a weathered piece?

Understanding the inherent qualities of premium teak outdoor furniture is the first step to ensuring its longevity and appearance. In this comprehensive guide, we will walk you through everything you need to know about teak outdoor furniture care. We will explore why teak changes color, the best ways to clean it without causing damage, and how to apply protective sealers for long-lasting results. We will also share tips for routine maintenance to keep your teak looking its best season after season.
One of the most common observations about outdoor teak furniture is its gradual transformation from a warm, golden-brown hue to a soft, silvery-gray patina. This change is entirely natural and, for many, a highly desirable aesthetic. But why does it happen?
Teak wood is naturally rich in oils, which are responsible for its remarkable durability and resistance to rot, pests, and moisture. When exposed to the sun’s ultraviolet (UV) rays and the elements like rain and humidity, these natural oils on the surface of the wood begin to oxidize. This oxidation process, combined with surface dirt and mildew accumulation, causes the wood’s pigment to change, resulting in the characteristic silver-gray color. It’s akin to how copper develops a green patina or silver tarnishes over time – a natural reaction to environmental exposure.
This silver-gray patina, often referred to as a “silver fox” finish, does not diminish the structural integrity or inherent strength of the teak. In fact, many enthusiasts appreciate this weathered look, finding it adds character and blends seamlessly with natural outdoor surroundings. If you prefer this aesthetic, your primary maintenance will focus on cleaning to prevent mildew and dirt buildup, allowing the natural patina to develop and deepen.
However, if your preference leans towards maintaining the original golden-brown warmth of your teak, or if you wish to restore a piece that has already grayed, intervention is necessary. The decision to intervene usually comes down to aesthetic preference. There’s no structural imperative to prevent graying, but if the gray has become uneven, splotchy, or if you simply miss the rich honey tones, then it’s time to consider cleaning and sealing. Regular care, including cleaning and applying a suitable protector, can effectively slow down the graying process and help preserve the wood’s vibrant original color, ensuring your investment in high-quality outdoor furnishings continues to bring joy.
Essential Teak Outdoor Furniture Care: Tools and Supplies
Before embarking on the journey to clean and restore your teak outdoor furniture, gathering the right tools and supplies is crucial. Having everything on hand will ensure a smooth, efficient, and effective process. We recommend using products specifically designed for teak, as these are formulated to clean effectively without stripping the wood’s natural oils or causing damage.
Here’s a comprehensive list of what you’ll need:
- Soft-bristle brush: Essential for scrubbing away dirt, mildew, and oxidized teak without scratching the surface. Look for brushes with natural or synthetic bristles that are gentle yet firm enough for effective cleaning.
- Microfiber cloths or lint-free rags:For wiping down surfaces, applying sealers, and ensuring an even finish.
- Garden hose with a spray nozzle:For wetting down the furniture and thoroughly rinsing off cleaning solutions. Avoid high-pressure settings.
- Teak cleaner: A specialized two-part teak cleaner (cleaner and brightener) or a single-step solution is highly recommended. These products are designed to remove oxidation, dirt, and mildew while restoring the wood’s color. Alternatively, for lighter cleaning, a mild solution of warm water and dish soap or a mix of soapy water and vinegar can be used for tough stains.
- Teak protector or sealer: This is key for preserving the golden hue and offering protection against UV rays and moisture. Ensure it’s a protector, not an oil, as oils can promote mildew growth and require more frequent reapplication.
- Rubber gloves: To protect your hands from cleaning solutions and sealers.
- Safety glasses: To protect your eyes from splashes.
- Old clothing: Cleaning teak can be a messy process, so wear clothes you don’t mind getting dirty.
- Drop cloths or tarps: To protect your patio, deck, or lawn from cleaning solutions and stains.
- Fine-grit sandpaper (optional, 180-220 grit): For lightly sanding heavily weathered areas to restore the original golden hue before sealing.
By preparing these items in advance, you’ll be well-equipped to tackle your teak furniture care project with confidence and achieve outstanding results.
Step-by-Step Guide to Cleaning Weathered Teak Surfaces
Cleaning weathered teak is the foundational step in restoring its beauty. This process removes accumulated dirt, mildew, and the oxidized gray layer, preparing the wood for protection. It might be messy, but the transformation is incredibly rewarding.
- Prepare Your Work Area: Lay down drop cloths or tarps to protect the surrounding surfaces from cleaning solutions and runoff. Ensure you’re working in a well-ventilated outdoor area, ideally on a sunny, dry day to facilitate drying. Wear your rubber gloves and old clothing.
- Wet Down the Furniture: Using your garden hose with a gentle spray nozzle, thoroughly wet down the entire piece of teak furniture. This helps to open the wood pores and prevents the cleaning solution from drying too quickly, which can lead to uneven results.
- Apply Teak Cleaner: Follow the instructions on your chosen teak cleaner. Typically, you’ll apply the cleaner directly to the wet wood. For two-part cleaners, you’ll apply the cleaner first, allow it to dwell for a few minutes (usually 3-5 minutes), and then follow with the brightener. For single-step cleaners, apply evenly over the surface. If you’re using a mild solution of warm water and dish soap or a vinegar mix for lighter cleaning, apply it generously.
- Scrub Along the Wood Grain: This is where the soft-bristle brush comes in. Gently but firmly scrub the entire surface of the furniture, always moving in the direction of the wood grain. Scrubbing against the grain can damage the wood fibers. Pay extra attention to areas with heavy dirt, mildew, or stubborn stains. You’ll notice the gray oxidation lifting away, revealing the golden wood underneath.
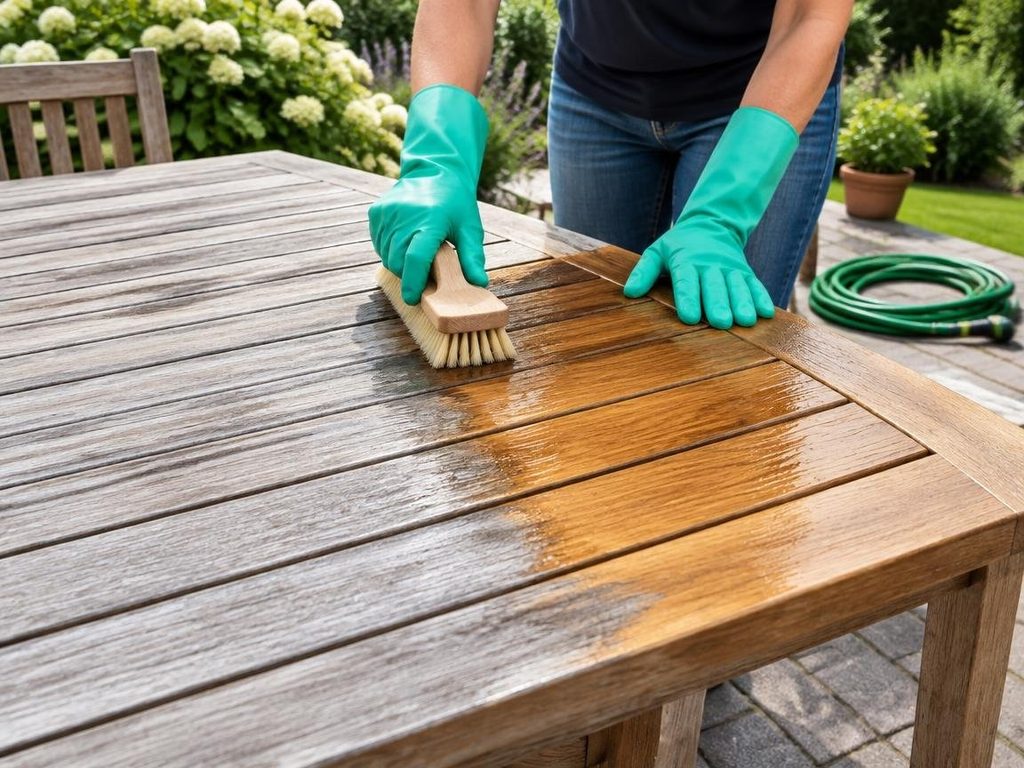
- Rinse Thoroughly: This is a critical step. Before the cleaner has a chance to dry on the wood, rinse the furniture thoroughly with your garden hose. Ensure all traces of the cleaning solution and loosened dirt are completely washed away. Any residue left behind can affect the final appearance and the adhesion of the protector. Rinse until the water running off the furniture is clear.
- Inspect and Repeat (if necessary):Once rinsed, inspect the furniture. If there are still areas of stubborn graying or stains, you may need to repeat the cleaning process on those specific spots. For very heavily soiled or oxidized pieces, a second full cleaning might be beneficial.
Multi-Day Teak Outdoor Furniture Care Cleaning and Drying Process
While the cleaning itself can be completed in a few hours, the drying process is paramount and should not be rushed. Teak is a dense wood, and it needs to be completely dry, deep into its core, before any protector or sealer is applied. Applying a sealer to damp wood can trap moisture, leading to mold or mildew growth under the finish, which can cause peeling or an uneven appearance.
We strongly recommend allowing your teak furniture to dry for at least 24 to 48 hours after a deep cleaning. This extended drying time ensures that all internal moisture has evaporated. If possible, choose a period of consecutive sunny, dry days for your project. This will optimize drying conditions.
Splitting the cleaning and sealing into separate days offers several advantages:
- Optimal Drying: Guarantees the wood is truly dry, preventing issues with sealer adhesion and longevity.
- Better Results: A completely dry surface allows the sealer to penetrate more effectively and cure properly, leading to a more durable and even finish.
- Reduced Stress: You won’t feel rushed to complete both tasks in one day, allowing you to take your time and achieve a higher quality outcome.
This multi-day approach, while requiring a bit more patience, is a best practice that significantly contributes to the long-term success and beauty of your teak restoration project.
How to Apply Teak Protector and Restore Golden Tones
Once your teak furniture is thoroughly cleaned and completely dry (remember that 24-48 hour drying period!), it’s time to apply a teak protector or sealer. This step is crucial for preserving the golden-brown color you’ve just restored and providing a barrier against the elements. It’s important to distinguish between teak oil and teak protector/sealer. While “teak oil” sounds intuitive, many commercial teak oils contain linseed oil or other oils that can actually promote mildew growth and require very frequent reapplication. A good teak protector or sealer, on the other hand, contains UV inhibitors and pigments designed to maintain the wood’s color and offer lasting protection.
Here’s how to apply it for the best results:
- Read Product Instructions: Always start by reading the specific instructions provided by the manufacturer of your chosen teak protector. Application methods, drying times, and recoat intervals can vary slightly between brands.
- Prepare for Application: Ensure your furniture is still in a well-ventilated area, preferably shaded, to prevent the protector from drying too quickly in direct sunlight. This allows for better penetration and a smoother application. Shake the protector can well before use.
- Apply the First Coat: Using a clean, lint-free cloth or a foam brush, apply a thin, even coat of the teak protector to the furniture. Work in small sections, always moving in the direction of the wood grain. Avoid applying too much product at once, as this can lead to streaking or an uneven finish. The wood will likely soak it up like a sponge, instantly transforming into a rich, warm honey brown.
- Allow to Dry: Let the first coat dry for the time recommended by the manufacturer, typically around 30 minutes to an hour. It should be dry to the touch before applying the second coat.
- Apply the Second Coat: Once the first coat is dry, apply a second thin, even coat of the protector, again following the wood grain. This second layer provides enhanced protection and a more uniform finish. For optimal long-term results and to truly refresh and protect your outdoor wood, we find products like those available from restores outdoor wood to be highly effective.
- Wipe Off Excess (if necessary):Some protectors recommend wiping off any excess product after a certain dwell time. Check your product’s instructions. If recommended, use a clean, dry lint-free cloth to gently wipe away any unabsorbed protector.
- Cure Time: Allow the furniture to cure completely before heavy use. This can take anywhere from 24 to 72 hours, depending on the product and environmental conditions.
Restoring Heavily Weathered Teak with Sanding
For teak that is heavily weathered, deeply grayed, or has a rough texture, a light sanding step before applying the protector can make a significant difference. Sanding helps to remove the stubborn oxidized layer that cleaning alone might not fully address, and it smooths out any raised grain, preparing a perfect surface for the sealer.
- Choose the Right Sandpaper: Use fine-grit sandpaper, typically 180-220 grit. Anything coarser can scratch the wood too deeply.
- Sand Lightly and Evenly: Gently sand the grayed areas, moving consistently with the wood grain. The goal is to remove the top layer of oxidized wood, not to reshape the furniture. You’ll see the golden color begin to reappear.
- Dust Cleanup: After sanding, thoroughly wipe down the furniture with a clean, damp cloth to remove all sanding dust. Allow it to dry completely before proceeding with the protector application. This ensures a clean surface for the sealer to adhere to.
This extra step can truly restore the original golden hue of grayed teak without affecting its structural integrity, giving your furniture a uniform and vibrant appearance.
Preventing Common Teak Outdoor Furniture Care Mistakes
While teak is incredibly durable, improper care can diminish its beauty and longevity. Being aware of common mistakes can save you time, effort, and potential damage to your valuable furniture.
- Using Pressure Washers: This is perhaps the most common mistake. While tempting for quick cleaning, a pressure washer can severely damage teak. The high pressure can blast away the wood’s natural oils, splinter the surface fibers, and create an uneven, fuzzy texture. It can also force water deep into the wood, leading to mold or mildew issues. Always opt for a garden hose with a gentle spray.
- Using Harsh Tools: Avoid metal brushes, steel wool, or abrasive scouring pads. These can scratch the teak, embed metal particles that cause rust stains, and remove too much of the wood’s surface. Stick to soft-bristle brushes.
- Ignoring Product Storage: Teak protector, like many wood care products, can become thick and chunky if stored improperly, especially in extreme temperatures. Always store your products indoors in a cool, dry place to maintain their consistency and effectiveness.
- Over-Oiling or Using the Wrong “Teak Oil”: As mentioned earlier, many products marketed as “teak oil” are actually blends of linseed oil or other oils that can darken the wood, attract dirt, and promote mildew growth, especially in humid climates. They also require very frequent reapplication. We recommend using a dedicated teak protector or sealer, which forms a protective barrier and contains UV inhibitors.
- Applying Sealer to Damp Wood: This is a crucial mistake that leads to peeling, uneven finishes, and trapped moisture. Always ensure your teak is completely dry, ideally for 24-48 hours, before applying any protector.
- Skipping the Rinse: Failing to thoroughly rinse off cleaning solutions can leave residue that affects the appearance of the wood and the adhesion of subsequent protectors.
By avoiding these pitfalls, you can ensure your teak furniture receives the best possible care, preserving its natural beauty and extending its lifespan for many years to come.
Routine Maintenance Between Deep Cleanings
While a deep clean and protector application are typically annual tasks, consistent routine maintenance throughout the year can significantly reduce the effort required for deep cleaning and help your teak maintain its pristine appearance. Regular attention prevents the buildup of stubborn stains and keeps your furniture looking fresh.
- Warm-Water Wipe-Downs: Every few weeks, or as needed, give your teak furniture a quick wipe-down with warm water and a soft cloth. This simple step helps remove surface dust, pollen, and light dirt before it has a chance to embed itself into the wood.
- Spot Cleaning: Address spills and stains immediately. Food spills, bird droppings, tree sap, or water stains should be gently cleaned off as soon as you notice them. A soft cloth with warm, soapy water (using a mild dish soap) is usually sufficient. Rinse the area thoroughly with clean water afterward. The longer these sit, the harder they are to remove and the more likely they are to leave a lasting mark.
- Breathable Covers: When your furniture is not in use for extended periods, especially during harsh weather or off-season, consider using breathable outdoor furniture covers. These covers protect against UV exposure, rain, dust, and debris. Ensure the covers are breathable to prevent moisture buildup and mildew. Avoid non-breathable plastic tarps, which can trap humidity.
- Winter Protection: In colder climates, if you’re not bringing your teak furniture indoors, ensure it’s thoroughly cleaned, dried, and protected before winter. Covering it with a breathable cover or moving it to a sheltered area (like a garage or shed) can help prevent excessive weathering from snow, ice, and extreme temperature fluctuations.
By incorporating these simple routine maintenance steps into your outdoor living habits, you’ll find that your annual deep cleaning and sealing process becomes much easier, and your teak furniture will consistently look its best, ready for enjoyment season after season.
Frequently Asked Questions About Teak Furniture
We often receive questions regarding the best practices for teak outdoor furniture care. Here are answers to some of the most common inquiries to help you further understand and maintain your teak.
Can you use a pressure washer to clean teak outdoor furniture?
No, we strongly advise against using a pressure washer to clean teak outdoor furniture. While it might seem like an efficient way to remove dirt, the high-pressure spray can cause significant damage to the wood. It can blast away the natural oils that protect teak, splinter the wood fibers, leading to a rough, fuzzy surface, and even compromise the structural integrity of the furniture over time. Instead, use a garden hose with a gentle spray nozzle, a soft-bristle brush, and a specialized teak cleaner or a mild soap solution. This gentle approach effectively cleans the wood without causing irreversible damage.
How often should outdoor teak furniture be cleaned and sealed?
For most outdoor teak furniture, a deep clean and the application of a teak protector/sealer are recommended annually. This yearly maintenance routine helps to revitalize the wood, restore its golden hue (if desired), and protect it from the elements. However, the frequency can vary slightly depending on your climate and how much exposure your furniture gets to sun and rain. In areas with intense UV exposure or frequent precipitation, you might consider a touch-up or reapplication every 6-9 months for optimal color retention. Between these annual deep cleanings, regular cleaning every few weeks with warm water and a soft cloth helps prevent stubborn stains and dirt buildup, keeping your furniture looking good year-round.
Can gray, weathered teak be restored to its original golden hue?
Absolutely! Gray, weathered teak can indeed be restored to its original golden hue. The process involves a thorough deep cleaning to remove the oxidized gray layer, dirt, and mildew. For heavily weathered pieces, a light sanding with fine-grit sandpaper (180-220 grit) can further help to remove the stubborn gray surface and smooth the wood. Once cleaned and completely dry (which is crucial), applying two light coats of a high-quality teak protector or sealer will bring back the rich, warm honey-brown finish. This protector contains UV inhibitors that help prevent future graying and maintain the restored color for an extended period. The transformation can be quite dramatic, making your furniture look almost new again.
Conclusion
Teak outdoor furniture represents a significant investment in quality and style for your outdoor living spaces. While its natural durability allows it to withstand the elements with minimal intervention, understanding and implementing a proper care routine is key to preserving its beauty and extending its lifespan. Whether you embrace the elegant silver-gray patina or prefer to maintain its warm, golden-brown glow, the principles of regular cleaning and protection remain paramount.
By following the steps outlined in this guide – from understanding why teak changes color to mastering the cleaning and sealing process, and avoiding common mistakes – you can ensure your teak furniture remains a cherished centerpiece for years to come. With a little care and attention, your timeless outdoor pieces will continue to offer comfort and sophistication, enhancing your outdoor experiences season after season.
- Fort Lauderdale, Florida Property Cleanout Guide: How to Plan a Smooth Clear-Out
- Enhancing Your Backyard with an Outdoor Shower Installation
- How West Odessa, Texas Homeowners Can Plan a Remodel for Heat, Wind, and Everyday Life
- How to Maintain and Restore Your Teak Outdoor Furniture
- 8 Best Furnace Installation Companies In Toronto